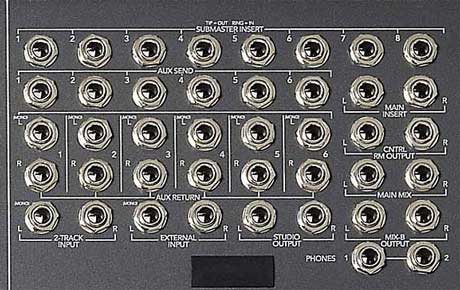
The master INs and OUTs are usually located above the master section on the mixing board or on the backside of the console.
Submaster Insert
The "Submaster Inserts" work just like the inserts on the channel strips. There is one 1/4" jack per SUB that sends the signal out of the board, through a device, and back into the board using a special "Y" cable.
TIP!!This board indicates that the "insert" jacks are wired for "TIP=OUT - RING=IN." As I mentioned, you need to use a special "Y" cable. It will have a male stereo 1/4" jack at one end and split into two male mono 1/4" jacks at the other. The mono ends of the cable should be labeled "TIP" and "RING." If you mistakenly connect them backwards into your effects unit, it won't work. If this happens, simply reverse them and you should be good to go.
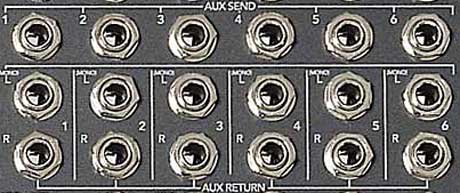
AUX Sends and Returns
This is where the audio signal is sent OUT of the console and IN to an effects device or headphone amp. If you are sending the signal through an effects device such as a reverb unit, you would return the signal back IN to board through the "AUX RETURNS" which in this example happen to be stereo. If you are using your AUX busses for monitors, then there will be nothing to loop back IN to the mixing board.
TIP!!If you are using a mono effect, you should use the "Left" AUX return.
MAIN INSERT
This would be for adding an effect to your entire mix. As before, you would need to use the "Y" cable here.
CNTRL RM OUTPUT
This is for sending a L/R mix to your monitors in the control room for you and other recording engineers to hear the mix as you are recording. The volume knob is located in the master section.
STUDIO OUTPUT
This is for sending a L/R mix to the studio where the musicians are playing. You would want to mute this during the actual recording unless it is feeding headphones. But it's a great way for the musicians to hear a take recording. The volume knob is located in the master section.
NOTE!!Because you are using this for home recording, you may not need all these different outputs. Unless you are lucky enough to have two rooms dedicated to recording in your home where one acts as the control room and the other as a studio.
As you know, each mixing board is different. Make sure you take the time to learn all of the INs, OUTs, INSERTS, and capabilities. This will save you time and frustration down the road.
What is your experience with mixing boards? What specific questions do still have? Do you have a Tip, Trick, or Tweak you would like to share? Email us. We'd love to hear from you!