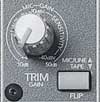
Gain / Trim
The gain knob is used to adjust the input or volume level for each channel. You'll need to adjust the knob until the level for that channel is at the ideal mixing level within the board.
How much gain you ask? That will be determined by how loud the initial instrument or source is. Use your light meters on the board to get the signal loud enough without clipping the board.
You may or may not have the "flip" switch on your recording console. This particular board has a second set of inputs on the backside of the board for playing back your recording. This switch simply determines which input you are using. During recording you'll want to choose "MIC/LINE." During mixdown you might choose "TAPE."
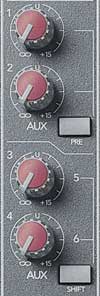
AUX or Auxiliary
The auxiliary section of your recording console can be used for various tasks. The two most popular uses are to add an effect such as reverb to your mix or to provide monitors for the musicians while they record.
These AUX knobs will be used in conjunction with the AUX knobs in the master section of the board. The actual INs and OUTs for the AUX section are located there.
TWEAK!!Let's say you have reverb going through "AUX 1." The higher you turn the "AUX 1 knob," the more reverb you add to your sound for that channel.
TWEAK!!For monitoring, let's say the drummer is monitoring the mix through "AUX 3." He has asked for more kick drum in his mix. You have the kick drum running through "channel 1" in the board. So you adjust the "AUX 3 knob" on "channel 1" to provide more kick drum in his headphones.
EQ - Equalization
The EQ section of the recording console is where the magic often happens. You can completely make or break your recording with EQ. Although, with good mics and micing technique, you may find you need very little if any EQ at all.
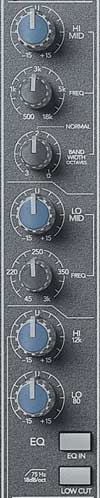
There are generally two types of EQ, parametric and graphic. A parametric EQ is the one shown here to the left. A graphic EQ us usually found on a rack unit and contains several, 16 or 32, small sliders.
We're only concerned with the parametric EQ for right now.
This particular recording console that I'm using as my example has a fairly elaborate EQ section. It is one of the reasons why this mixing board was so popular.
The top three knobs are all related. They control the HI MID frequencies. The top knob adjusts the amount of BOOST or CUT. The middle knob allows you to choose which frequencies you're boosting or cutting (this is what's known as a "Sweepable" EQ because of this knob). The third knob labeled "BANDWIDTH" allows you to choose the range of frequencies. It is sometimes labeled as "Q."
The next two knobs effect the "Low Mid" frequencies. The top knob adjusts the amount of BOOST or CUT. The bottom knob is your sweepable frequency knob allowing you to choose which frequencies to boost or cut.
Below that you have the "HI 12K" knob. This adjusts the BOOST or CUT of the really high frequencies usually found in your cymbals or sibilance in the voice. And the "LO 80" knob adjusts the BOOST or CUT of the extreme low frequencies such as the bass guitar or the kick drum.
TIP!!If you have plenty of time to focus on the mixdown, I highly recommend not using the EQ at all during the recording phase. If your console has an "EQ IN" button, simply set it so the EQ section is being completely bypassed. Then you can turn it back on during mixdown. If your board does not have an "EQ IN" button, just set all of your EQ knobs pointing straight up at center unity.
The "low cut" button is useful for recording outdoors. By adding the low cut, you are filtering out the really low frequencies often caused by wind noise. Basically, if you hear a lot of rumble in the microphone, turn this on to minimize the noise.
MIX-B
One great feature about this Mackie 8-Bus recording console that I'm using as an example is its MIX-B section. It basically has enough INs and OUTs on each channel to allow two complete mixes.
This way you can stop and listen to your recording with a rough mix using the MIX-B PAN and LEVEL knobs without changing your recording levels. Many mixing boards do not have this feature and unfortunately, Mackie has discontinued making this recording console. But you can still find them on Ebay from time to time.
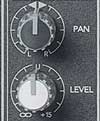
Fader Section
The "PAN" knob at the top of this section of the recording console affects how that channel will sound in a stereo mix. For example, if you turn the knob to the left, it will sound louder in the left speaker. And vise versa to the right.
TIP!!For recording, just leave this knob at center unity.
You will also notice that there are four LEDs (Light Emitting Diode) in this section of the console. The first one labeled "OL" is your clip indicator. The OL stands for Over Load. If that light flashes then your input level is too high. Start by turning down the "GAIN" knob at the top of the channel strip. If that doesn't work, you'll have to turn down the amp or add a PAD (sometimes referred to as an attenuator). Some mixing boards and condenser mics have a PAD switch built into them.
The green LED labeled "-20" is your signal indicator. This is a very handy LED and some boards don't have one. Basically, when the channel senses a sound louder than -20 db, this light will flash. It is very helpful when mixing.
Below the PAN knob is a red LED and a button labeled "SOLO." When you press the solo button, the red LED will light up. You should also see a red light in the master section of the board known as the RUDE light. It's to get your attention so you know one or more channels are soloed.
The solo button is very useful for adjusting your channel levels in the board. It should have no effect on the recording outputs incase you need to check something while recording. But it will solo that channel in your monitors.
The yellow LED and button labeled as "MUTE" are for muting the channel. This will affect your recording, so don't press this while recording.
TIP!!When setting up your tracks before you start recording, it is helpful to mute all the other tracks until you are ready for them.
Fader slider
The fader slider controls how much volume you are sending to either the master section of the board or the direct out. You'll adjust this to fine tune your recording levels.
Along the right side of the fader slider are several buttons. The first four are labeled 1-2, 3-4, 5-6, 7-8. They refer to the sub channels in the master section of the recording console. By pressing the "1-2" button, you send the signal from the channel strip to the busses 1 and 2.
TIP!! Let's say your recording interface can only record up to 8 tracks at a time. You have six microphones on the drums, which only leaves two tracks for the rest of the band. Here's what you do...
...assign all of the drums channels on the mixing board to busses 1 and 2. Have the drummer play and adjust the levels until you are happy with the mix. Then run the outputs from subs 1 and 2 into two tracks on your recording interface. BAM! You now have 6 available tracks to record the rest of the band!
The bottom button labeled "L/R" sends the channel signal to the main Left and Right outputs in the master section of the recording console. This is for monitoring purposes while recording. Your studio monitors and headphones will all most likely need to have this button depressed in order to monitor the recording in the control room.
TIP!!If you have your microphone connected properly and you see the signal indicator light flashing, but don't hear anything check to make sure you are sending the signal to the master section of the recording console. Most likely you'll need to press the "L/R" button beside the fader.