Mac USB MIDI Setup How to Configure Your MIDI Studio on a MAC
Using the USB Port in Your MIDI Keyboard or Instrument. by Ron Tongue
A USB MIDI port for connecting to your computer is becoming more and more common on many of today's MIDI keyboards and MIDI instruments. A big advantage to the USB MIDI keyboard port is that it has a higher bandwidth. Because of the small data size of MIDI information, the USB bandwidth won't make your MIDI tunes play any better. But the USB port will save you time when doing dump transfers or transferring digital audio between your instrument and computer.
Note:I just found this out the hard way when connecting my Alesis Fusion 6HD to my computer with the USB cable. Just because your MIDI keyboard has a USB port does NOT mean it can communicate MIDI data through it. Check your owners manual for more information. I'll use my Roland Fantom X8 to finish this session.
If you only have a few MIDI instruments, then the USB MIDI port may be a good option for you. It will save you a few steps in configuring your computer and save you money because you won't need a MIDI interface.
Follow the steps below to begin.
Step 1: Install the USB MIDI drivers for your MIDI keyboard or instrument.
It should have come on a CDROM with your instrument. If you don't have the CDROM, don't worry, just go to the manufacturers website for your keyboard and download the drivers. If you also don't have Internet, then you have cause to worry. No drivers, no USB MIDI.
Step 2: Turn the power on to all of your MIDI keyboard or instrument.
In order for your computer to determine what hardware you have, it must be turned on.
NOTE!!Before your MIDI keyboard will respond to a MIDI signal you may have to configure your instrument and put it in a "MIDI" mode. For my Roland Fantom X8, I had to choose "Menu" then "System" then "USB" and set the USB mode to "MIDI."
Step 3: Launch your "Audio MIDI Setup" utility.
The Audio MIDI Setup utility is where you will configure your computer to communicate with your USB MIDI equipment. Here, you will identify each piece of MIDI equipment in your studio and "show" the computer how everything is connected.
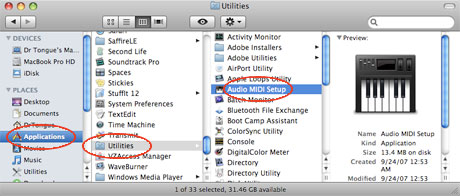
To launch the Audio MIDI Setup:
Open your "Applications" folder.
Inside the "Applications" folder find and open the "Utilities" folder.
When you open the "Utilities" folder, double click on the "Audio MIDI Setup" icon.
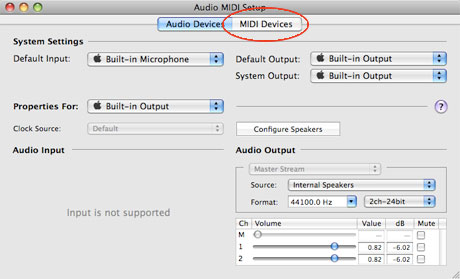
Step 4: Click on the "MIDI Devices" tab.
At the top of the Audio MIDI Setup window there are two tabs. Click on the tab named "MIDI Devices."
Step 5: Connect your USB MIDI keyboard or instrument to your computer's USB MIDI port.
If you happen to have already connected them, it's ok. If not, now is a good time. Within moments of connecting your keyboard to your computer, you should see an icon appear with the name of your keyboard. In my case it reads Roland Fantom-X.
NOTE!! You should also notice that the picture in the icon looks like a MIDI interface, NOT a keyboard. This is because your computer sees the USB port on your keyboard as a MIDI interface. You'll have to add your keyboard as a device which we'll do in the next step.
If you don't see your USB MIDI instrument icon, first make sure the power is turned on and the USB MIDI cable is properly connected. Second, click the "Rescan MIDI" button (toolbar) at the top right of the Audio MIDI Setup window.
NOTE!! When you disconnect your MIDI device, it is recommended that you turn OFF your computer first. I don't normally, but you should because the manual says so.
Step 6 (Optional): Create a new configuration from the drop down menu.
Locate the "Configuration" drop down menu along the toolbar at the top of the window. Select "New Configuration" from this menu. Then give your configuration a name. When you are finished, click the "OK" button.
Step 7: Add your MIDI Instruments and Devices.
A MIDI device in this case will be your MIDI keyboard. Other MIDI devices include effects units, digital recording units, stage lighting units...
To add a device:
Click on the "Add Device" button in the toolbar. A new icon should appear.
Double-click on the icon and its configuration window will appear.
Give the device a name then choose the manufacturer and model from the two drop down menus. If you want to change the icon, click on the default icon and choose one from the list.
For more advanced options click on the "More Information" button, which is just above the "Apply" button. These options mostly likely will not need to be changed for your current use.
Click the "Apply" button when finished
Click the small red circular button in the far upper left corner of the device window (this will close the window).
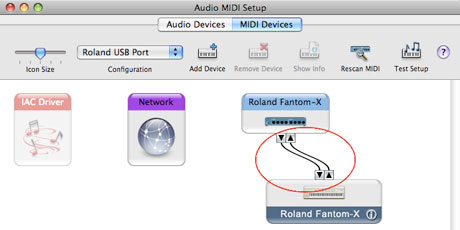
Step 8: Drag to connect all your "INS" and "OUTS."
Along the bottom of your MIDI interface icon there should be two or more small arrowheads. These represent the "inputs" and "outputs" of your MIDI interface. Locate the far left arrowhead that points down. When you click and drag it with your mouse you should notice a black line, which will appear to be coming out of the MIDI interface. This is supposed to represent an actual MIDI cable. Click and drag to connect the down arrows together and the up arrows together.
Tip!! If you make a mistake, you can easily clear the cables and start over. To do this, click on the "MIDI" menu at the very top of your computer monitor. From that menu, choose "Clear All Connections." A small window will appear asking you if you are sure. Click "OK" to confirm.
At this point you may want to test your configuration by clicking the "Test Setup" icon in the Audio MIDI Setup window. Don't rely too much on this option though. You may or may not hear anything. With my setup, the "Test Setup" button has no effect, but when I launch my MIDI software, it works fine.
Step 9: Close the Audio MIDI Setup utility.
Every time you make a change in the Audio MIDI Setup utility, it is automatically saved. So when you are finished, simply choose "Audio MIDI Setup" menu at the very top of your computer monitor. Then choose "Quit Audio MIDI Setup" to quit the software.
Step 10: Configure your MIDI software.
You may or may not need to do this step. Most likely your MIDI software will automatically detect your MIDI instruments based on the settings you just made in the Audio MIDI Setup. Just make sure within your software that you choose the correct MIDI channel for each MIDI track you plan to record to.
Congratulation! You are finished configuring your operating system. Keep in mind that any software you operate that uses your MIDI hardware will automatically refer to this configuration. Whenever you make a physical change in your studio (such as a new keyboard) you need to update this change in the "Audio MIDI Setup" utility.
Also, check the "help" options available for the Audio MIDI Setup utility. You can either click the small question mark in the toolbar or choose the "help" menu at the very top of your computer monitor.
Be sure to check the user documentation that came with your Mac MIDI interface. Many manufacturers also provide driver updates on their websites. Be sure to check there from time to time to keep your hardware drivers are up to date.
For specific problems related to the Audio MIDI Setup utility, check out Apple's website for all kinds of useful information. You can access their support page by clicking here.