An Overview of the Various Options
Found on many Mixing Boards by Ron Tongue
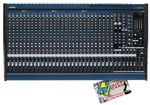
Let's take a closer look at the different sections of many mixing boards and their functions. Keep in mind, that there are tons of different models and designs. I'm going to go over the most common functions that are found on many recording consoles.
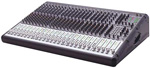
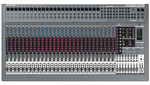
I'll be referencing the Mackie 8 Bus console since it's what I'm currently using in my home studio.
At a first glance a recording console can seem somewhat intimidating with so many knobs, buttons, lights... Don't let it fool you. It's much easier than it may first seem.
TIP!! Keep this in mind as you are working with your mixer, audio goes IN at one points, passes through the board, and goes OUT in another.
Let's start with the Channel INPUT section.
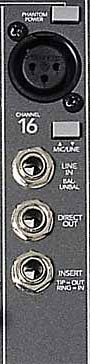
At the top of each channel strip or backside of the console are several INPUT options. You should see the same options for every channel on your board. I'm going to briefly discuss each option here.
Phantom Power
Here is where you turn the phantom power on or off. Phantom power sends a voltage down the microphone cable to provide power for your condenser microphones.
On this particular mixing board, one phantom power switch provides power to eight channels at a time. Refer to your users manual to determine how your console is configured.
CAREFULL!!Make sure your fader levels are down or the channels are "muted" before pressing this button. It may send a POP sound out of your board.
CAREFULL!!Although phantom power will not harm your dynamic microphones, DO NOT apply it to your ribbon microphones as it can damage them.
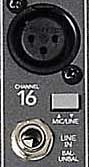
INPUTS
There are two inputs for each channel on most mixing boards. Notice the XLR input for connecting a three-prong microphone cable. And just below the XLR input is a 1/4" input jack labeled "LINE IN - BAL. UNBAL."
You will only use ONE of these two inputs per channel. You also have to indicate on the mixing board which input you are using be selecting the little switch in between the two jacks.
TIP!!If you plug your microphone into the board and don't get a signal check these two things.
Are you using a condenser microphone? If so, make sure your phantom power is turned on. Mute the channel the engage the phantom power.
Make sure you indicate on the console which input you are using (XLR or 1/4") by depressing or un-depressing the MIC/LINE switch.
Direct Out
The direct out is for sending the signal OUT of the board and IN to your recording interface. The fader usually controls the level or volume output for the direct out.
This is an incredibly useful option for multi-track recording. Ideally, each channel on your board will have a direct out. Boards for "live" use don't always have a direct out. For recording, I highly recommend purchasing a console that has this feature.
Tip!!Try to be consistent with channels and recording tracks. For example, try to have "channel one" on the console record to "track one" on your interface or computer. If you have to mix them up, be sure to take careful notes so you remember what track is what when you start your mixdown.
Insert
The "insert" jack is actually an IN and OUT in one jack. This is for adding an effect such as a compressor / limiter to only that channel. You will need a special "Y" cable for using this jack.
NOTE!!If you want to add an effect, which you'll use over multiple channels, you'll want to insert that into one of your auxiliary busses.
Basically, the audio signal goes OUT the "insert" jack and IN to your effect. Then it loops though the effect and back IN to the board.
TIP!!This board indicates that the "insert" jacks are wired for "TIP=OUT - RING=IN." As I mentioned, you need to use a special "Y" cable. It will have a male stereo 1/4" jack at one end and split into two male mono 1/4" jacks at the other. The mono ends of the cable should be labeled "TIP" and "RING." If you mistakenly connect them backwards into your effects unit, it won't work. If this happens, simply reverse them and you should be good to go.